Stereoscopic Encoding Guide for Windows Media
Content
Introduction
This guide explains how to encode stereoscopic video files for playback using
Stereoscopic Player. It is
assumed you have already edited the video in some video editing application and
want to a efficiently compressed file for distribution now. We will use the
Windows Media-based Dual Stream format (spezification)
for the following reasons (a legacy guide for
DivX is also available):
- Compatible with 2D video playback software (shows left view only)
- Makes use of dual core CPUs
- Provides best encoding efficiency vs. decoding complexity ratio
- Supports streaming
- Free encoder available
Let's Start
First, export left and right view from your video editing application to
separate files. To obtain best quality, use an uncompressed format or a lossless
codec (e.g. Huffyuv).
If you are using side-by-side or over/under format for editing, convert it to
separate left and right files. Many video editing applications allow you to
specify cropping when exporting the file. If your video processing application
does, export left and right view successively by cropping the right or bottom
half in the first pass and the left or top half in the second pass. If you
cannot specify cropping, export to side-by-side or over/under format and create
left and right views in
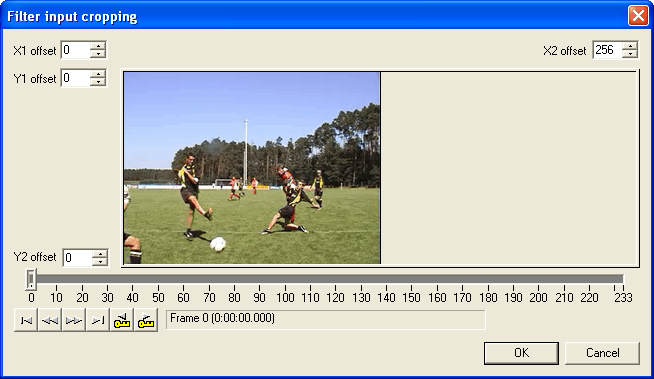
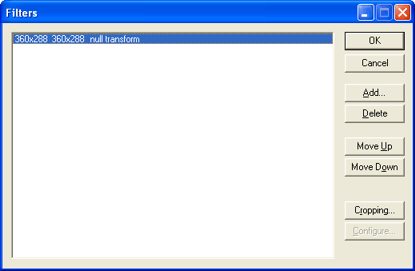
VirtualDub: Click File->Open video file and Video->Filters.
Press the Add button to insert the null transform filter. Click on
the Cropping button and crop half of the image (adjust X2 offset
for side-by-side format or Y2 offset for over/under format). File->Save
as AVI will save the left movie to the hard disk. Adjust the cropping
settings for the right view (X1 or Y1 offset) and save the right
movie to hard disk.

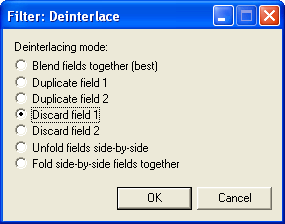
VirtualDub can also convert interlaced (= field-sequential) sources to
separate left and right files. Instead of the null transform filter, use
the deinterlace filters and select Discard field 1 in the first
and Discard field 2 in the second pass.

Encoding
Now that we have an left and right file available, we encode both in Windows
Media Encoder. The following steps must be executed for both files. If you do
not have
Windows Media Encoder installed yet, download it from the Windows Media
website.
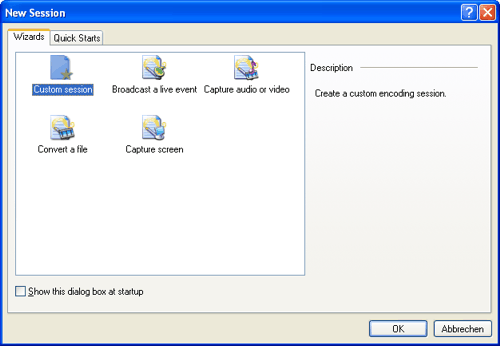
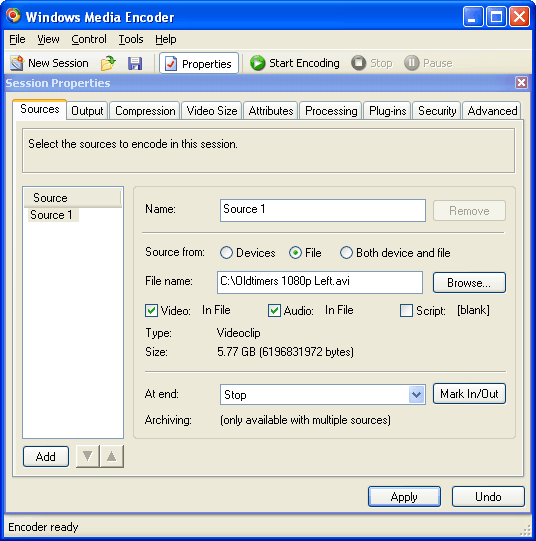
Run Windows Media Encoder an select Custom session in the New
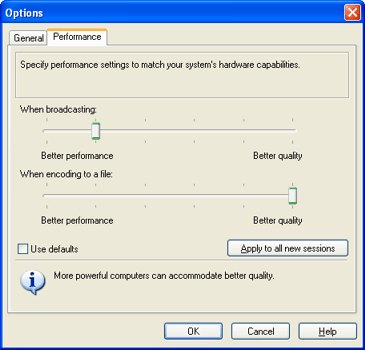
Session dialog. Click Tools->Options and move the bottom slider to
the most-right position. If you accept slightly lower quality for faster
encoding speed, you can leave the slider at its default position. Press Apply
to all new session to make the new settings permanent.
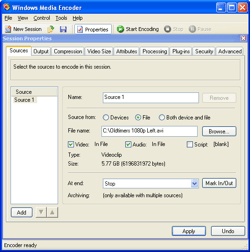
If the session properties window is not visible, press the Properties
button in the toolbar. On the Source tab, select File source and
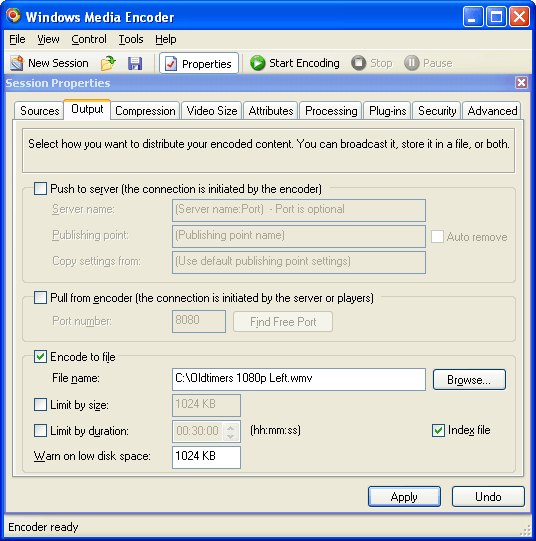
browse for your left (or right) video. On the Output tab, select
Encode to file and enter the output filename.
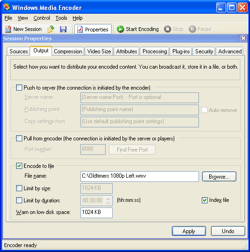
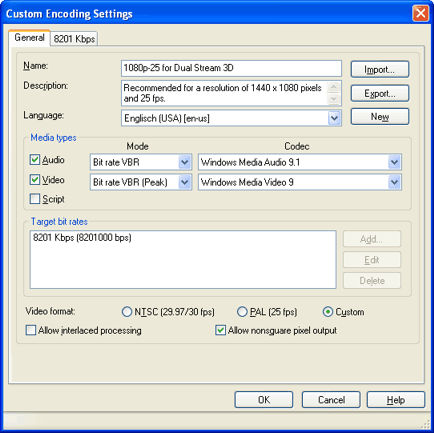
The Compression tab allows to select and configure the audio and video
codec. Proper compression settings are crucial for a good playback experience,
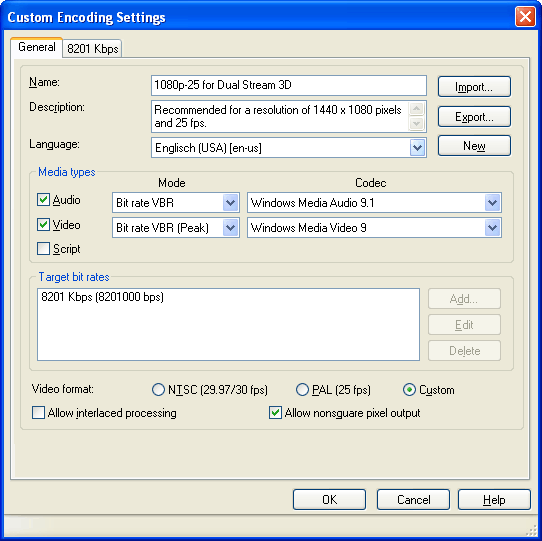
so choose them with care! Click Edit to create a custom encoding profile.
We recommend to click Import and load one of the
recommended profiles.
This package includes profiles for streaming quality, 480p, 576p, 720p and 1080p
resolutions at frame rates of 24 (film), 25 (PAL) and 29.97 / 30 (NTSC) frames
per second.

We recommend to author your content in one of the following standard video
formats. Italic formats are highly recommended because they correspond with
broadcast standards. In case your content differs from these formats, derive
your profile from one of the recommended profile which matches in frame rate and
has a similar resolution.
30 fps formats are valid at 29.97 fps as well. Captured content is more
likely to show 29.97 fps whereas computer generated content is often rendered at
30 fps. Nevertheless, make sure your enter the exact frame rate in the Custom
Encoding Settings dialog. 24 fps should be used for high definition formats
(1280 x 720, 1440 x 1080 and 1920 x 1080) only. High definition formats formats
support 24 fps, 25 fps, 29.97 fps as well as 30 fps.
| |
|
Format |
|
Average Bitrate |
|
Key
Frames |
|
Buffer
Size |
Quarter
resolution |
|
320 x 240 Pixel, 30 fps
360 x 240 Pixel, 30 fps
360 x 288 Pixel, 25 fps
384 x 288 Pixel, 25 fps |
|
250 - 1000 kbps |
|
15 sec |
|
5 sec |
Half
resolution |
|
640 x 240 Pixel, 30 fps
720 x 240 Pixel, 30 fps
720 x 288 Pixel, 25 fps
320 x 480 Pixel, 30 fps
360 x 480 Pixel, 30 fps
360 x 576 Pixel, 25 fps
384 x 576 Pixel, 25 fps |
|
500 - 3000 kbps |
|
15 sec |
|
5 sec |
Full
resolution |
|
640 x 480 Pixel, 30 fps
720 x 480 Pixel, 30 fps
720 x 576 Pixel, 25 fps |
|
4 - 6 Mbps |
|
10 sec |
|
5 sec |
High
definition |
|
1280 x 720 Pixel
1440 x 1080 Pixel
1920 x 1080 Pixel |
|
6 - 10 Mbps
8 - 12 Mbps
10 - 16 Mbps |
|
5 sec
3 sec
3 sec |
|
5 sec
3 sec
3 sec |
All table values are just recommended values, you can choose lower or higher
bitrates if necessary. Increasing buffer size and key frame interval may improve
the codec's efficiency, but cause longer delays when starting playback and
longer seeking durations, respectively.
Use the following codecs (if they are not available, upgrade to the latest
Windows Media
Player and Windows Media Encoder):
- Windows Media Video 9
- Windows Media Audio 9.1 for mono or stereo soundtracks
- Windows Media Audio 9.1 Professional for multi channel or high
definition sound tracks
The Windows Media Video 9 Advanced Profile codec currently does not
provide any quality advantage over the Windows Media Video 9 codec, but
is pre-installed on less systems. Therefore, we advise against using it. The
Windows Media Video 9 codec supports both constant bit rate (CBR) and
variable bit rate (VBR) encoding. Bit rate VBR (Peak) is recommended
because it adopts best to a sequence of static and high motions scenes while
limiting the bit rate peaks to a reasonable value. Bit rate peaks may cause
dropped frames during playback due to CPU overload or bandwidth limitations. The
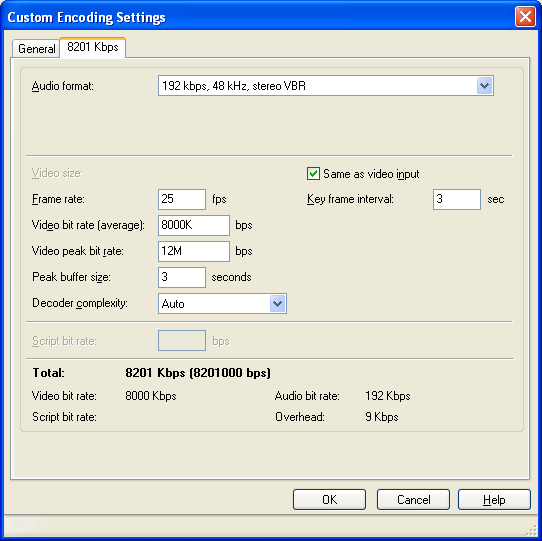
peak bitrate should be about 150% of the average bitrate.
The selected audio sampling frequency (44 kHz, 48 kHz, 96 kHz) and
quantization (16 bits, 24 bits) should match the source audio format.
Recommended audio bitrates for stereo content:
| Low quality: |
|
64 kbps |
| Middle quality: |
|
128 kbps |
| High quality: |
|
256 kbps |
Language should match the language of your audio track. If there is no
sound track or it is language neutral, select English (USA) [en-us].
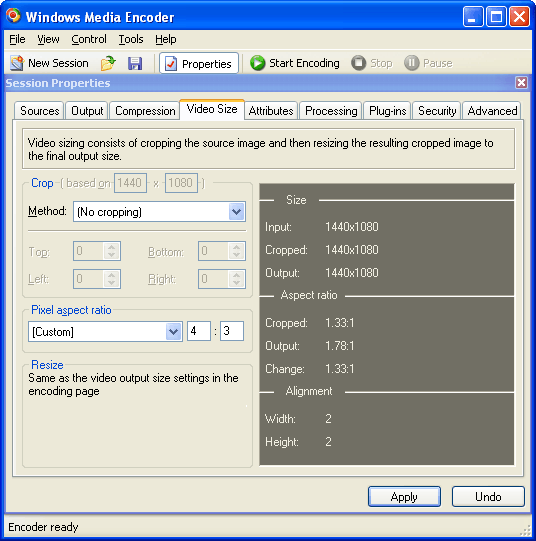
Check Allow nonsquare pixel output if the video pixels are not square
(anamorphic pixels). The pixel aspect ratio can be chosen on the Video size
tab. Select [Custom] and enter the pixel aspect ratio. Please note that
pixel aspect ratio and display aspect ratio are not the same! To calculate the
required pixel aspect ratio, divide the desired display ratio by the source
resolution. Example: A 720 x 576 pixel source should be displayed at 16:9
display aspect ratio. This requires a pixel aspect ratio of (16:9) / (720:576) =
64:45. The following table lists common pixel aspect ratios:
| Source Resolution |
|
Display Aspect Ratio |
|
Pixel Aspect Ratio* |
| 720 x 240 |
|
4:3 |
|
4:9 |
| 720 x 240 |
|
16:9 |
|
16:27 |
| 720 x 288 |
|
4:3 |
|
8:15 |
| 720 x 288 |
|
16:9 |
|
32:45 |
| 720 x 480 |
|
4:3 |
|
8:9 |
| 720 x 480 |
|
16:9 |
|
32:27 |
| 720 x 576 |
|
4:3 |
|
16:15 |
| 720 x 576 |
|
16:9 |
|
64:45 |
| 1280 x 720 |
|
16:9 |
|
1:1 |
| 1440 x 1080 |
|
16:9 |
|
4:3 |
| 1920 x 1080 |
|
16:9 |
|
1:1 |
* Using these values, the video will be played back in the
desired display aspect ratio, but they do not take analog blank into account. As
a result, the image might be slightly distorted (details).
Anyway, you will not notice the difference ;-)

Stereoscopic Player requires progressive content. If you did not deinterlace
your content during editing, enable Deinterlacing on the Processing
tab.
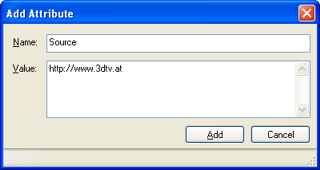
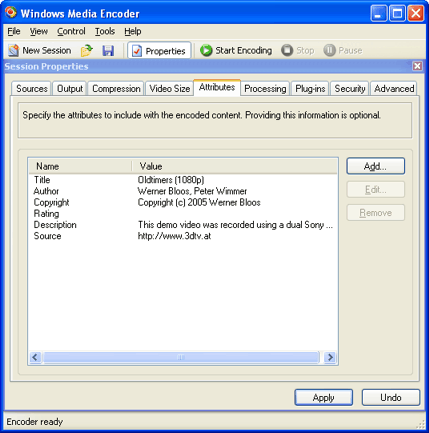
Before you start encoding, you should add some metadata on the Attributes
pages. Besides the default attributes Title, Author, Copyright
and Description, Stereoscopic Player also evaluates the Source
attribute. It should contain information where to obtain the file, usually a
reference to a website.
Finally, press the Start Encoding button and have a coffee break ;-)
Afterwards, encode the right view.
Multiplexing
In the previous chapter, we created a left and right Windows Media files.
Using Stereoscopic Player's File->Open Left and Right File feature, it
would be possible to play them in 3D. However, we would like to merge them to a
single file, because only the single file/dual stream format offers best
usability.
We use the Windows Media Stereo Muxer
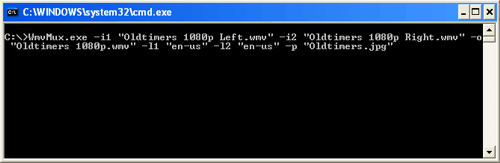
command line tool to multiplex left and right file. Open a command line window (Start->Run,
enter Cmd) and type WmxMux.exe -i1 "Oldtimers 1080p Left.wmv" -i2 "Oldtimers
1080p Right.wmv" -o "Output.wmv" (adjust the filenames). If WmvMux.exe and
your video files are not located in the same directory, it is necessary to
specify paths, e.g. "C:\Left.wmv". Input one (-i1) must be the
left file, input two (-i2) the right file. Run WmvMux.exe without
parameters to get a list of all available options.
Stereoscopic Player displays a preview image for each video in the built-in
video library. The preview image can be embedded in the Windows Media file, so
that no additional metadata
file is required. The following restrictions apply for preview images:
- JPEG format
- 160 x 120 pixels resolution
- Maximum size of 10 kB (10240 Bytes)
To embed the preview image, use the -p <file> parameter, for example
-p "Oldtimers.jpg".
By default, the output file will contain the audio track of the first (left)
input file only. To keep all audio tracks, specify the -a parameter. Use
this option only if your left input file doesn't contain an audio track but only
the right one. Avoid to multiplex two audio tracks into the output file (except
multi language audio tracks, see below)!
If you have forgotten to choose the proper language in Windows Media Encoder,
the Windows Media Stereo Muxer allows to fix it. Specify -l1 "en-us" and
-l2 "en-us" to set the language of all streams to English. A list of
valid
language codes is available here. The complete command will look like this:
Windows Media Stereo Muxer will display an error message if the input files
differ in length. If you edited and encoded left and right files properly, this
should never happen. Nevertheless, parameter -x allows to ignore
different lengths and -d <time> limits the duration of the output file.
For example -x -t 6000 will copy the first minute of input files
differing in length to the output file. Use these options only if you know
exactly what you are doing!
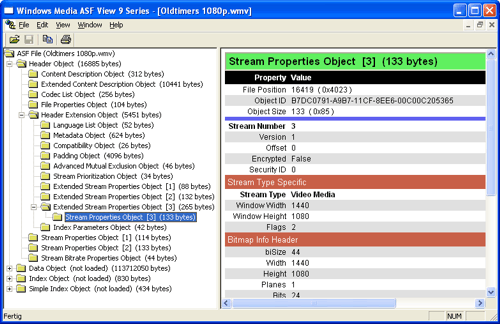
To check and understand the final output file, open it in the
Windows Media ASF View (available from Microsoft). Make sure there are three
streams (three Stream Properties Objects), two video streams and one
audio stream. There should also be an Advanced Mutual Exclusion Object
including the video streams. It prevents 2D players from showing both video
streams.
Advanced Features
- Multi stream files: Specify additional input files -i3 <file>,
-i4 <file> and so on. Input files must be ordered from left to right,
-i1 is the most-left view.
- Multi language audio tracks: Inputs -i1 and -i2
should contain video streams only. To remove audio streams from existing
Windows Media files, use the Windows Media Stream Editor, which is shipped
together with Windows Media Encoder. Encode each audio track separately. The
same profile must be used to encode the audio tracks! The Windows Media Stereo
Muxer's command line will be like this: WmvMux.exe -i1 "Left.wmv" -l1
"en-us" -i2 "Right.wmv" -l2 "en-us" -i3 "English.wma" -l3 "en-us" -i4 "German.wma"
-l4 "de-de" -p "Preview.jpg" -a
- 2D Intro: It is possible to define an intro at the beginning of the
file which will be played back by 2D video players only, but skipped by
Stereoscopic Player. The intro can be used to display a message like 'This is
a stereoscopic video file. Use Stereoscopic Player to play it in 3D.' The
intro must be present in the original left and right files. The -t <time>
parameter is used to define the intro duration. For example, -t 500
sets the intro duration to 5 second. Click here to download uncompressed 25
fps intro files in 288p, 576p,
720p and 1080p resolutions.
- Digital Rights Management: Encrypting a file requires the
Windows Media Rights Manager SDK. You can obtain it from Microsoft. Dual
stream files are encrypted the same way as ordinary video files. Please
consult the Windows Media Rights Manager SDK for more details. Do not use
player individualization because this mechanism is not supported by
Stereoscopic Player yet. Don't use advanced security levels either.
|